Data exploration is a crucial step in any data analysis or data science project. It involves examining the data to gain insights and identify patterns or trends. Even though this process is typically challenging and time-consuming, spreadsheets make data exploration way easier. This is where Mito comes into play!
Mito is a Python library that generates code as you explore data in a spreadsheet, allowing you to improve productivity and save time on data exploration.
Let’s learn what Mito is, how to use it, and how it enables you to use AI to explore data through text prompts.
What Is Mito?
Mito is an open-source data exploration tool for Python that provides an easy-to-use UI for exploring, filtering, and managing data in a spreadsheet. It is designed to simplify and streamline the process of data exploration by offering a wide range of features for loading, manipulating, visualizing, and analyzing data in spreadsheets. With Mito, you can explore and edit data just like you would do in Excel. This helps business users gain insights and uncover patterns in their data quickly and efficiently.
What is unique about Mito is that it gives you the Python code equivalent to the data exploration operations you performed visually. This improves data scientists’ productivity and allows users to build data exploration scripts without having to know Python.
From a technical point of view, Mito is a spreadsheet embedded in a Jupyter Notebook that can generate pandas code.
Let’s see how to use it!
How to Set Up Mito in Python
Learn what you need to do to set up Mito.
Prerequisites
To get started with Mito, you need to meet the following list of prerequisites:
- Python 3.6+ installed on your PC
- A Jupyter Notebook or JupyterLab project
Then, you can install Mito as follows:
- Open the terminal and download the Mito installer with:
python -m pip install mitoinstaller
- Run the installer with:
python -m mitoinstaller install
That command will install Mito for classic Jupyter Notebooks and JupyterLab 3.0. Note that the installation process may take a while to complete.
Great, you are now ready to start dealing with Mito!
Creating a Mitosheet
Launch your Jupiter project and create a new Notebook. Then, paste the following two lines of Python code:import mitosheet
mitosheet.sheet()
Click the “Run” button and the following window should appear in your Notebook:

Follow the sign-up wizard to enable the Mitosheet, the spreadsheet with code generation capabilities offered by Mito.
Importing some data
Click on the “Import Files” button and select the data source you want to import into Mito:

Mito supports several data sources. These include:
- CSV files, both locally and remotely
- Excel files, both locally and remotely
- Dataframes
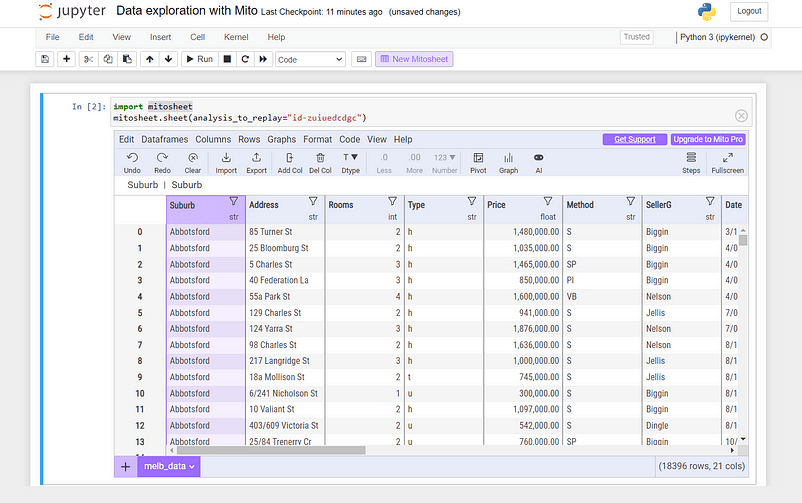
If your source data gets imported successfully, you should see something similar to:

Note the advanced spreadsheet capabilities offered by Mito.
Explore Data Through Text Prompts With Mito AI
Mito has recently launched a new feature called Mito AI. This is a powerful tool that enables users to edit data in a spreadsheet with plain text prompts. At the time of writing, that feature is currently in open beta.
Click the “AI” button and accept OpenAI’s privacy policy. You should now get access to the AI Transformation section:

In the “Prompt” text area, type the operation you want to perform on your data. For example: “filter out rows with a Price lower than 200000.”
Then, click the “Generate Code” button. Mito AI will generate the Python code that attempts to make the desired edit on the data. Inspect the code generated by Mito and if it looks good click “Execute Code.” After the code executes, scroll down to the “Results” section to see the effect of the generated code on your data.
Well done! With Mito, exploring data in Python has never been easier, but there is still a lot to learn!
Generating Code for Data Exploration With Mito
All that remains now is to visually explore the source data in the Mitosheet. Edit, add, remove, sort, and filter out some data with some point-and-click operations.
After ending your operation, Mito will add a new Notebook cell containing some code. That automatically generated snippet corresponds to the Python logic required to get the same results on data achieved visually in the Mitosheet.
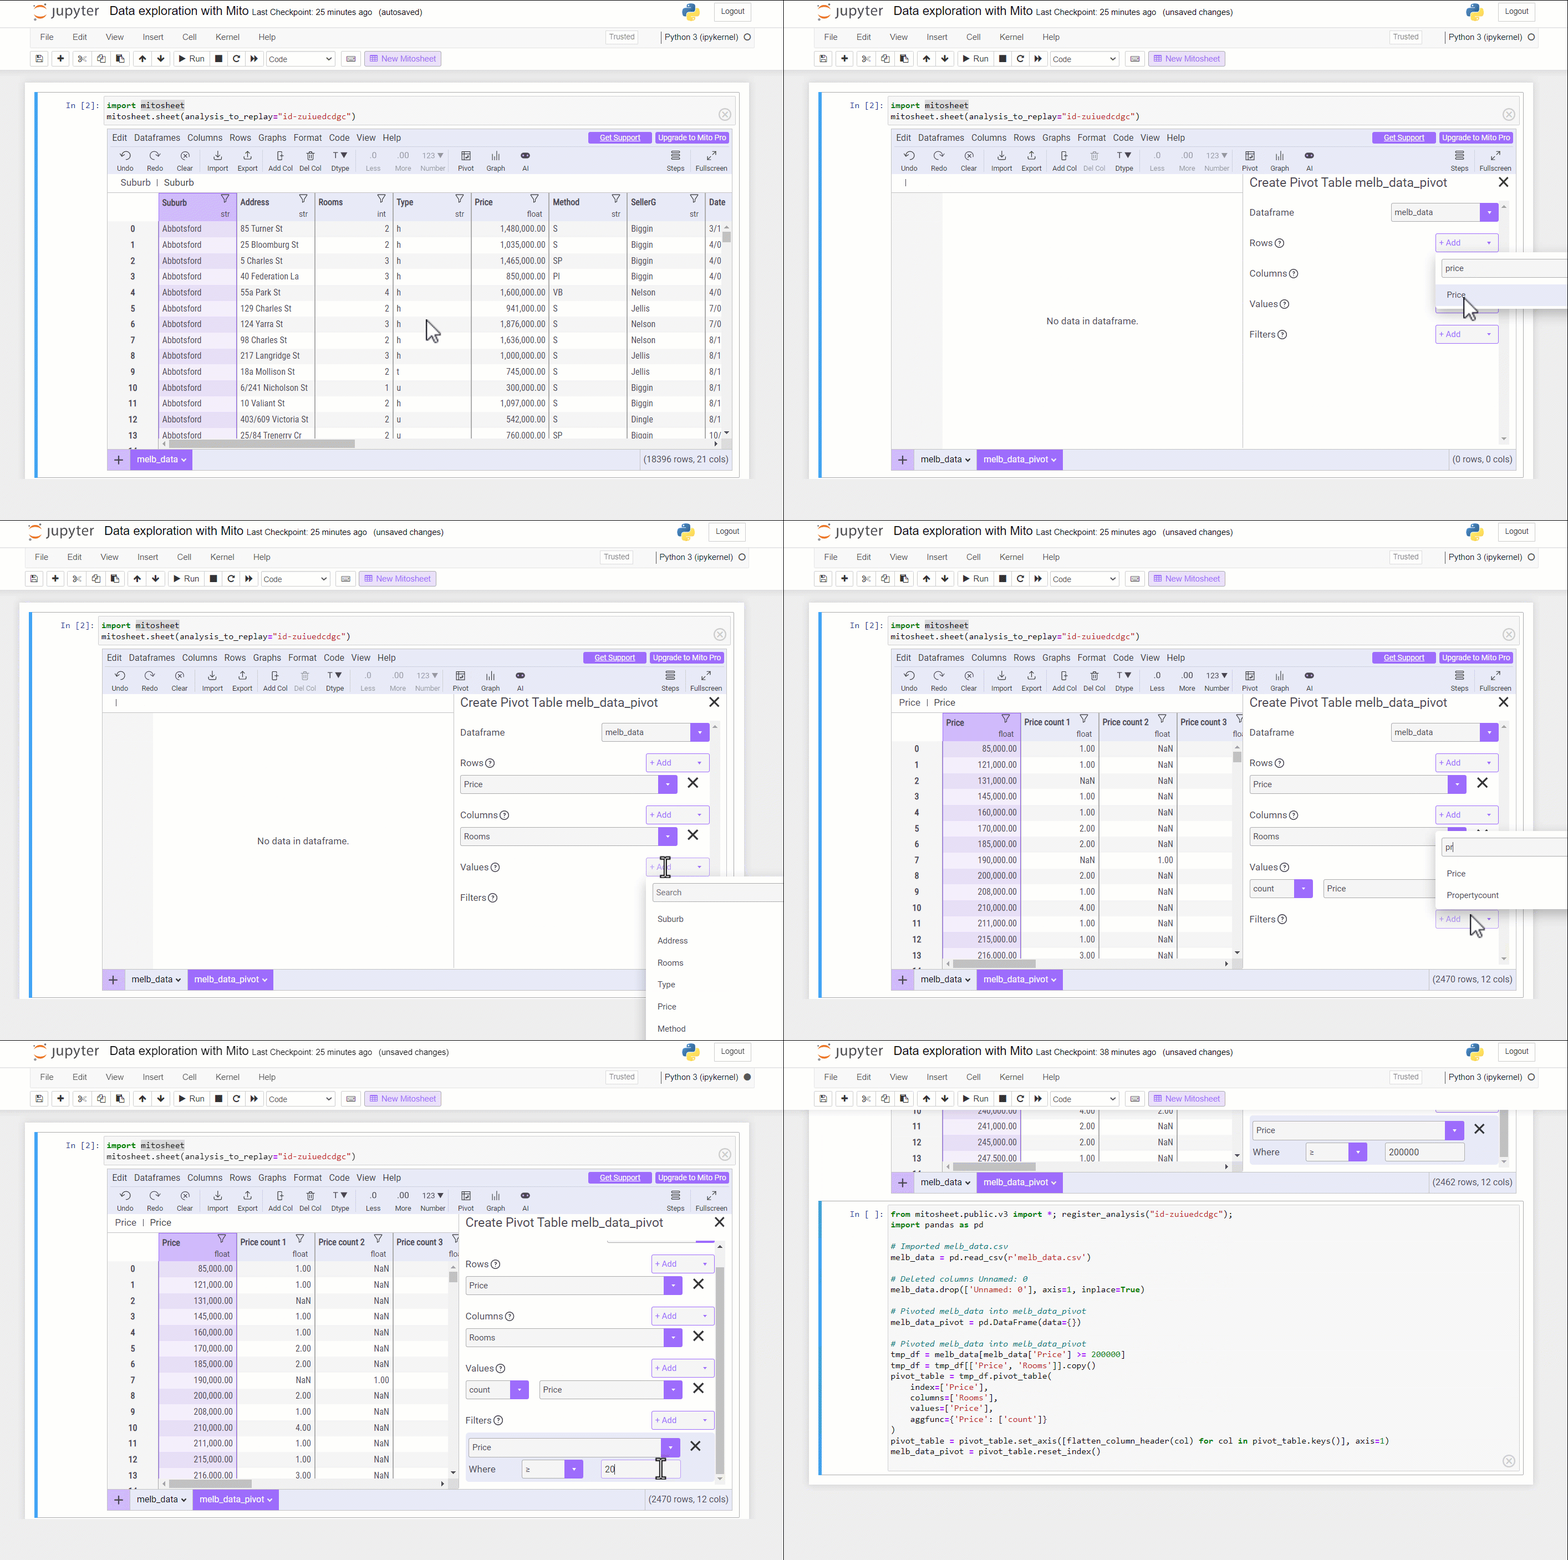
In the example below, we use Mito to create a pivot table directly in the spreadsheet:

This is what the Notebook cell generated by Mito at the end of the data exploration operation looks like:

In detail, this is the code produced by the tool:
import pandas as pd

# Imported melb_data.csv
melb_data = pd.read_csv(r'melb_data.csv')

# Deleted columns Unnamed: 0
melb_data.drop(['Unnamed: 0'], axis=1, inplace=True)

# Pivoted melb_data into melb_data_pivot
melb_data_pivot = pd.DataFrame(data={})

# Pivoted melb_data into melb_data_pivot
tmp_df = melb_data[melb_data['Price'] >= 200000]
tmp_df = tmp_df[['Price', 'Rooms']].copy()
pivot_table = tmp_df.pivot_table(
    index=['Price'],
    columns=['Rooms'],
    values=['Price'],
    aggfunc={'Price': ['count']}
)
pivot_table = pivot_table.set_axis([flatten_column_header(col) for col in pivot_table.keys()], axis=1)
melb_data_pivot = pivot_table.reset_index()
As you can see, it contains everything you need to create a pivot table in Python with pandas, comments included.
Note that this is just a simple example, but Mito supports many other advanced data exploration and visualization features. These include graphing, spreadsheet formulas, data frames combination, and more.

Explore the official doc to find out what Mito has to offer!
Conclusion
In this article, you learned what Mito is and how it can help you produce data analysis scripts in Python. By loading data in a spreadsheet in Jupyter Notebook, it allows you to visually explore data in a spreadsheet while automatically generating Python code. This helps you save time and energy, allowing even non-technical users to define data exploration scripts in Python.
Thanks for reading! I hope you found this article helpful.