Visual Studio Code is one of the most popular open-source code editors available. Thanks to the wide range of features it provides, VSC makes coding easier, faster, and less frustrating. This is especially true when it comes to TypeScript, one of the several languages supported by VS Code natively.
Some of the features that make TypeScript developers more productive in VS Code include code completion, parameter hints, and syntax highlighting, which makes it easy to identify and distinguish different parts of the code. Also, VS Code comes with a built-in Node.js debugger that allows you to debug your TypeScript code directly in the editor. At the same time, most of these features need to be configured to get the most out of them.
Follow this step-by-step tutorial and learn how to set up Visual Studio Code for TypeScript development. First, you will see how to initialize a Node.js project in TypeScript. Next, you will use VSC to write some TypeScript code. Finally, it will be time to understand how to compile, run, and debug TypeScript code in VS Code.
How To Set Up VS Code for TypeScript Development
Let’s jump into TypeScript development with VSC!
Prerequisites
Before getting started, make sure you have:
- Node.js installed and configured locally.
- Visual Studio Code (VS Code) downloaded and installed.
You can verify that Node.js is installed on your machine with the command below:
node -vThis should return the version of Node.js locally available, as below:
v18.14.0You will need Node.js to set up an npm project in TypeScript and run its compiled files.
Now that you met all prerequisites, it is time to get started with TypeScript in VSC!
Install the TypeScript Compiler
Visual Studio Code supports TypeScript development but does not include the TypeScript compiler. This is a requirement to test your TypeScript code. In detail, the TypeScript compiler tsc can transpile TypeScript code to JavaScript. In other words, tsc takes TypeScript code as input and produces JavaScript code as output. Then, you can execute the JS code with Node.js.
Launch the command below in your terminal to install the TypeScript compiler tsc globally on your computer:
npm install -g typescriptVerify the version of tsc installed with:
tsc --versionIf this command does not return an error, it means that tsc works as expected. You now have everything you need to build a TypeScript project!
Create a TypeScript Project
Let’s create a sample Node.js TypeScript project called “hello-world.” Open your terminal, create a project for your folder, and enter it with:
mkdir hello-world
cd hello-world
Inside hello-world, initialize an npm project with the npm init command below:
npm init -yThis will create a package.json config file for your Node.js project. Time to see what the project consists of in VCS!
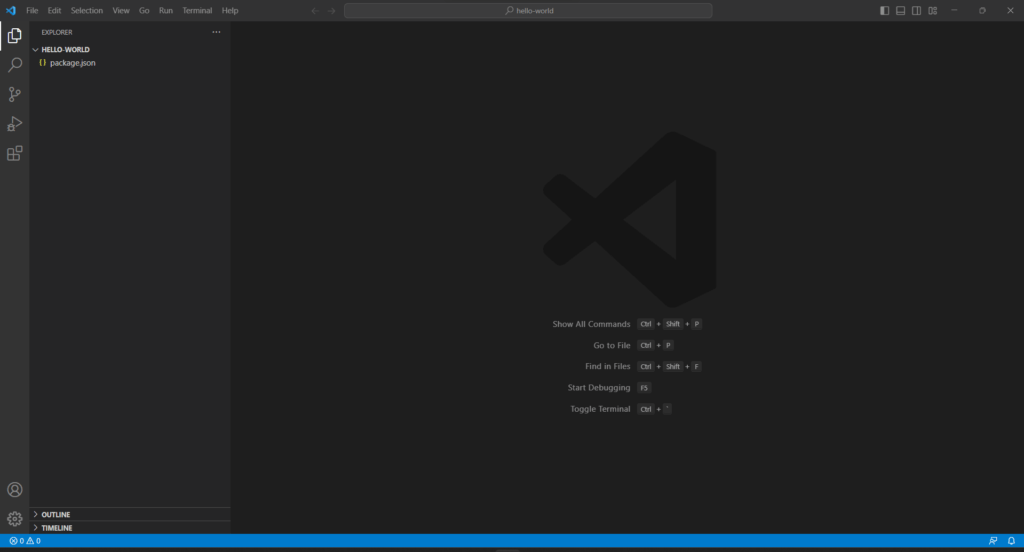
Launch Visual Studio Code and select the “File > Open Folder…” option as shown below:

This will open a file-explorer popup window. Select your project folder and click “Open.” This is what your project will look like:

As you can see, it only consists of the package.json file initialized by npm init.
Next, click on “View > Terminal” to get access to the VSC integrated Terminal. Here, launch the command below:
npx tsc --init This will initialize a TypeScript configuration file named tsconfig.json in the project directory.
The tsconfig.json file allows you to customize the behavior of the TypeScript compiler on your project basis. In detail, tsconfig.json provides the TypeScript compiler with instructions on how to transpile the TypeScript code. Without it, tsc will not be able to compile your TypScript project as desired.
Open tsconfig.json in Visual Studio Code and you will notice that it contains a comment for each config option available. Comment out what you do not need and make sure tsconfig.json looks like as follows:
{
  "compilerOptions": {
    "target": "es2016",
    "module": "commonjs",
    "sourceMap": true,
    "outDir": "./build",
    "esModuleInterop": true,
    "forceConsistentCasingInFileNames": true,
    "strict": true,
    "skipLibCheck": true
  }
}
The only difference with the original file created by npx tsc --init are the two lines below:
"sourceMap": true,
"outDir": "./build",
sourceMap creates source map files for emitted JavaScript files As you will learn in the next steps, these map files are required by the VSC compiler. Instead, the outDir configuration defines where the transpiled files will be emitted by the compiler. By default, this corresponds to the root folder of the project. To avoid filling your project folder with build files at every compilation, you should set it to another folder, such as "./build".
Your TypeScript project is now ready to be compiled, but first, you need a TypeScript file.
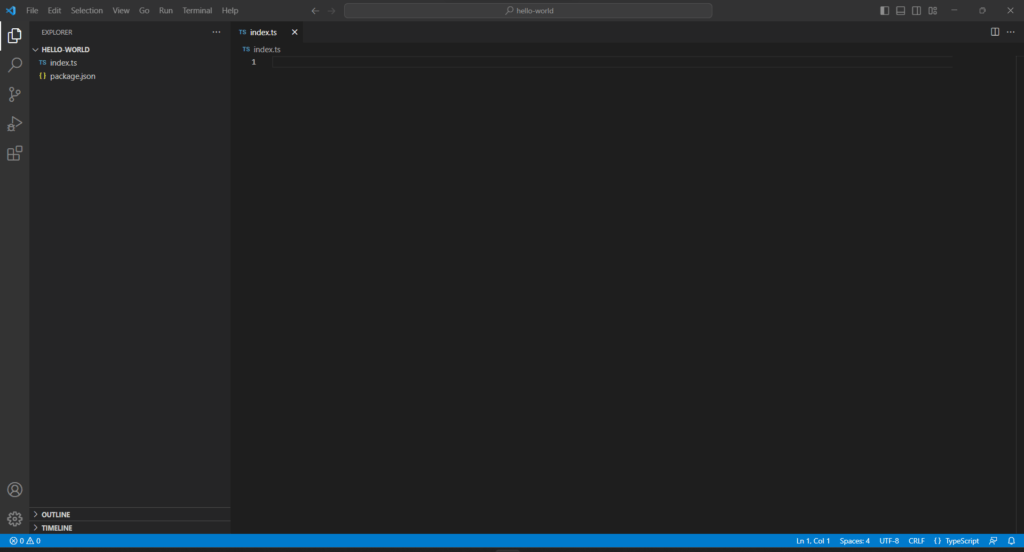
Right-click on the “Explorer” section, select “New File…”, type “index.ts,” and press Enter. Your project will now contain a TypeScript file called index.ts:

index.tsInitialize it with the TypeScript code below:
const message: string = "Hello, World!";
console.log(message);
This code will simply print the “Hello, World!” message.
Try IntelliSense for Code Completion
When writing the lines of code above in VS Code, you might have noticed some code suggestions made by the editor. This happens because of IntelliSense, one of the greatest features offered by Visual Studio Code. IntelliSense refers to a set of code editing tools offered by VSC that include features like code completion, docs information, and parameter info on functions.
Take a look at IntelliSense in action in the GIF below:

As you can see, IntelliSense automatically suggests how to complete the code as you type it. This can significantly improve your productivity by reducing the time and effort required to write accurate code.
Keep in mind that VSC comes with IntelliSense support for TypeScript projects out of the box. So, you do not have to configure it manually.
You know how to write TypeScript code like a pro in Visual Studio Code. Let’s learn how to compile it and see if it works!
Compile the Code in VS Code
Before setting up VS Code to compile your TypeScript code for you, you need to verify that your project works. Open the integrated terminal in VSC and run the command below:
tsc -p .This will transpile the TypeScript project located in the current directory according to the tsconfig.json configuration file. Specifically, the -p . part indicates to the compiler to use the tsconfig.json file located in the current directory.
The resulting JavaScript files will be placed in the ./build directory, as you can verify in VS Code:

index.js file inside the build folderVerify that the transpiled JavaScript code works with:
node ./build/index.jsThis command will run the Node.js JavaScript file produced by index.js and should print:
Hello, World!Great! The code produced by the compiler works as expected. This means that you set up your TypeScript project correctly.
If you want to avoid repeating the procedure described above again and again, click on “Terminal > Run Build Task…” and select the “tsc: build – tsconfig.json” option as below:

This operation will run tsc -p . behind the scenes and build your code directly in the editor. You now know how to compile your TypeScript project in VS Code. All that remains is to figure out how to launch and debug the code.
Run and Debug the Code
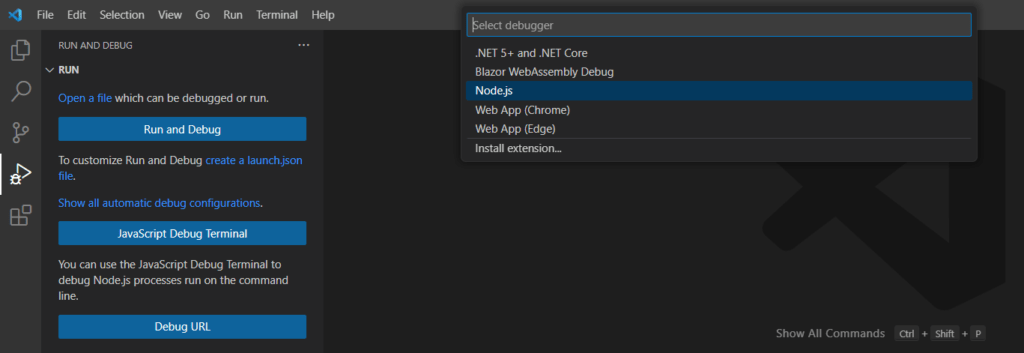
Visual Studio Code supports TypeScript debugging thanks to its built-in Node.js debugger. To use the debugger, you must first set it up. Click on the “Run and Debug” icon on the left menu, click “create a launch.json file,” and select “Node.js.”

This will create a default Node.js launch.json file for you. launch.json is the configuration file used by the Visual Studio Code debugger to launch and debug an application. This config file contains specifies how to launch the application, the command-line arguments to use, and the environment variables to set.
As you can notice in the “Explorer” section, launch.json is located in the .vscode folder of a project:

launch.json fileOpen it, and edit it as below:
{
    "version": "0.2.0",
    "configurations": [
        {
            "type": "node",
            "request": "launch",
            "name": "Launch Program",
            "skipFiles": [
                "node_modules/**"
            ],
            "program": "${workspaceFolder}/index.ts",
            "preLaunchTask": "tsc: build - tsconfig.json",
            "outFiles": ["${workspaceFolder}/build/**/*.js"]
        }
    ]
}
Specifically, you need to change the program, preLaunchTask, and outFiles options considering that:
-
program: Specifies the path to the entry point of the application to debug. In Typescript, it should contain the main file to execute when launching the application. -
preLaunchTask: Defines the name of the VSC build task to run before launching the application. In a TypeScript project, it should be the build task. -
outFiles: Contains the path to the transpiled JavaScript files generated by the build process. The source map files generated bytscthanks to the"sourceMap": trueconfig are used by the debugger to map the TypeScript source code to the generated JavaScript code. This allows you to debug TypeScript code directly.
Save the launch.json file and open index.ts. Click on the blank space before the console.log() line to set a breakpoint. A red point will appear as below:

When running the code with the compiler, the execution will stop there. Thanks to this breakpoint, you can verify that the Node.js debugger in VS Code is working as expected.
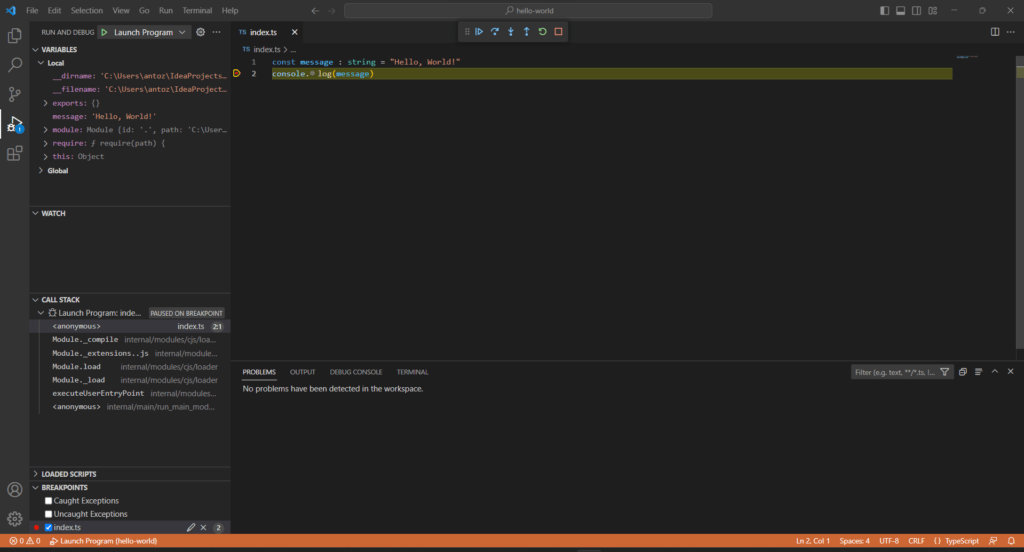
Visit the “Run and Debug” section again and click on the “▷” green button to run the debugger. First, you will have to wait for preLaunchTask to be executed. After the code has been compiled, the program will be launched and execution will stop at the breakpoint set before:

On the left, you can see the values of the variables at the time of the stop. Also, you can pause, step over, step in/out, restart, and stop as described on the official doc page. Press F5 to resume the execution and you should see the message below in the DEBUG CONSOLE tab:
Hello, World!This is what you expect the application to produce and means that the program has been executed correctly.
Fantastic! You just learned how to set up Visual Studio Code for TypeScript programming. The tutorial may end here, but there is one more important thing to learn. Let’s see how to configure an extension in VS Code to make coding in TypeScript on VSC easier.
Set up ESLint
The core of Visual Studio Code is pretty basic but it can easily be extended by the many extensions available. These provide additional features and functionality to the code editor.
One of the most popular VSC extensions for TypeScript development is the ESLint extension. This allows you to run ESLint directly within the editor. Specifically, ESLint is a popular static code analysis tool for JavaScript and TypeScript that helps developers identify and fix common coding errors and enforce coding standards. Let’s integrate ESLint into VS Code in your TypeScript project.
First, initialize ESLint in your project with:
npm init @eslint/configDuring the configuration process, the command will ask some questions to understand how to generate the ESLint configuration file. You can answer as follows:
√ How would you like to use ESLint? · style

√ What type of modules does your project use? · commonjs

√ Which framework does your project use? · none

√ Does your project use TypeScript? · No / Yes

√ Where does your code run? · browser

√ How would you like to define a style for your project? · guide

√ Which style guide do you want to follow? · standard-with-typescript

√ What format do you want your config file to be in? · JSON

Checking peerDependencies of eslint-config-standard-with-typescript@latest

Local ESLint installation not found.

The config that you've selected requires the following dependencies:

eslint-config-standard-with-typescript@latest @typescript-eslint/eslint-plugin@^5.0.0 eslint@^8.0.1 eslint-plugin-import@^2.25.2 eslint-plugin-n@^15.0.0 eslint-plugin-promise@^6.0.0 typescript@*

√ Would you like to install them now? · No / Yes

√ Which package manager do you want to use? · npm
At the end of the process, you will notice a new .eslintrc.json file containing the following code:
{
    "env": {
        "browser": true,
        "commonjs": true,
        "es2021": true
    },
    "extends": "standard-with-typescript",
    "overrides": [
    ],
    "parserOptions": {
        "ecmaVersion": "latest"
    },
    "rules": {
    }
}
.eslintrc.json is a configuration file used by ESLint to enforce specific code, style, and quality standards. This is what a basic .eslintrc.json for a Node.js TypeScript project looks like:
{
    "env": {
        "browser": true,
        "commonjs": true,
        "es2021": true,
        "node": true
    },
    "extends": "standard-with-typescript",
    "overrides": [
    ],
    "parserOptions": {
        "ecmaVersion": "latest",
        "project": "tsconfig.json"
    },
    "rules": {
        "indent": ["error", 2],
        "no-multi-spaces": ["error"]
    }
}
Now, it is time to install the ESLint extension in VSC. Click on the “Extensions” icon on the left menu and type “ESLint.” Find the ESLint extension and click “Install.”

To enable the ESLint extension to automatically inspect your TypeScript files and run ESLint on save, define a settings.json file inside .vscode with:
{
    "editor.codeActionsOnSave": {
        "source.fixAll.eslint": true
      },
      "eslint.validate": [
        "typescript"
      ],
      "eslint.codeActionsOnSave.rules": null
}
Note that settings.json is a configuration file used by Visual Studio Code to customize the behavior of the editor and its extensions. To make VS Code loads the new extension and configurations, you need to restart it.
If you open index.ts and start playing with the code, you will see new errors reported by the IDE. When it comes to code style errors, save the file and ESLint will automatically reformat the code as defined in .eslintrc.json.

Wow! Nothing can stop you from writing quality code anymore!
Conclusion
In this tutorial, you learned what you need to do to configure Visual Studio Code for development in TypeScript. In detail, you saw how to create a Node.js project in TypeScript, load it into VS Code, and use it to write code assisted by IntelliSense. You also looked at how to configure the TypeScript compiler, set up the Node.js compiler to debug TypeScript code, and integrate ESLint into the project.